Learn how to draw a face by following these simple steps.
Knowing how to draw a face and head accurately and realistically is key to developing effective characters. When it comes to drawing heads, nothing is set in
stone; different characters have vastly different features. However, a basic understanding of how to draw and a grounding in head anatomy will enable you to experiment confidently, and these skills will certainly improve your drawings.
On this page I’ll show you how to draw a face, moving from initial drawings to using references, and sharing my personal techniques. Once you've mastered that, flip to page two to learn how to further your skills. I’ll offer some advice on how to draw a face with personality and how to show different expressions. Right, grab a sketchbook or your Cintiq and let’s get cracking!
Click on the icon at the top-right of the image to enlarge it.
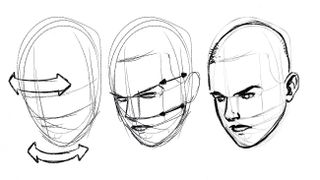
01. Start with two circles

I start off by drawing two overlapping circles. Where they intersect is the eye level. From there, put a centre line down the two circles. This gives the basis of the human head.
02. Add construction lines
Draw two lines slightly in from either side of your circles. These will indicate where the forehead and cheekbones sit. From the centre intersection, place a triangle for the nose and mark out where you want the mouth to go. Then add two triangles for the eyes – these will also help you locate the eyebrows and eye sockets.
03. Explore different proportions
You can experiment with different sized circles to give different head dimensions. The more squashed the circles, the wider and heavy the face, while the more elongated the circles, the longer the head shape.
04. Line up the features
Always remember that the eyes, nose and mouth are on the same plane on the face, otherwise things start to go a bit lopsided and weird! Imagine the facial features are wrapped around a cylinder, so they have a natural curve.
Position the top of the eyebrow and bottom of the nose so that they’re lined up with the height of the ear. This helps the face look more natural; giving it a flow, and stopping it from feeling flat.
05. Start with the eyes
Your character’s eyes are crucial to conveying the right emotion. Try to keep them focused and tell a story with them. Give the top eye a thicker line to indicate a shadow from the eyelid, and add a light source to give them life. Longer and thicker eyelashes create a more feminine look.
06. Add in the nose
I keep a little sketchbook to practise different lip shapes. Study films and TV programmes to see how actors exaggerate their mouths. Experiment and explore different mouth shapes. Try to convey ‘oh’, ‘ah’ and ‘esss’: this will help when you want figures to look like they’re having a conversation.
08. Consider differences between male and female faces
The male face is a harder, angular shape. The female face is softer and rounder in general. For women, try to depict fuller lips, larger eyes and rounder cheeks. These are not hard and fast rules, though – just a guide.
09. Finish with some hair
Comments
Post a Comment